Capturing data with a high-speed camera involves several critical parameters. While settings such as frame rate (frames per second, fps), focus, and aperture show their effects immediately in the software’s live preview, the influence of exposure time, typically measured in microseconds, only becomes fully apparent during post-processing in WaveCam. Although increasing the exposure time brightens the image under constant lighting conditions, its effect on optical flow calculations is more complex. The following section explains why exposure time matters and how to estimate a suitable setting.
Exposure time is the duration for which the camera's digital sensor, either CMOS or CCD, is exposed to light. A longer exposure time produces a brighter image, but it can also blur objects that move quickly during the exposure period.
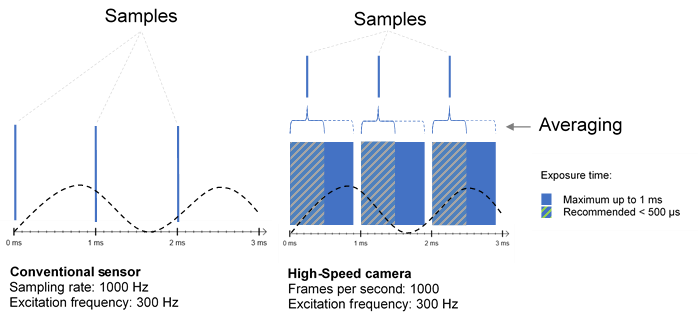
When recording video for WaveCam analysis, this blurring, must be carefully considered. This becomes clearer when comparing the measurement procedure to that of a conventional sensor. A conventional sensor sampling at 1 kHz captures a distinct, discrete data point every millisecond (see Fig. 1, Left). In camera-based measurement, the corresponding data point is a single image in the video sequence. However, this image is captured over the selected exposure time and therefore represents an average over a time window rather than a discrete point in time (see Fig. 1, Right). Because vibration analysis typically involves rapid spatial displacements, this averaging can distort the resulting analysis. For example, at a frame rate of 1000 fps, one image is captured every 1000 µs. If the exposure time is set close to this frame interval, the image represents an average over almost the entire sampling period. This strong temporal averaging can attenuate or even suppress frequency peaks in the upper frequency range. By contrast, if the exposure time is only 10 µs, the images represent relatively discrete data points.
For initial tests on an object, we recommend setting the exposure time to less than half of the maximum available frame time (see Fig. 1, Right).
Keep in mind that the absolute optimal settings will always depend on your specific test object (size, weight, material) and the overall test setup (mounting and excitation method).